Physical Address
304 North Cardinal St.
Dorchester Center, MA 02124
Physical Address
304 North Cardinal St.
Dorchester Center, MA 02124

Are you tired of watching your vehicles, boats, or expensive outdoor equipment suffer under the relentless sun, heavy rain, or piles of snow? Finding a durable, reliable, and spacious shelter that doesn’t require a permanent structure can be a real headache. If you’re asking yourself, “Is the EROMMY 20×20 carport worth buying,should I buy EROMMY carport,EROMMY carport pros cons,best heavy-duty carport,EROMMY vs other carports,20×20 metal carport honest,” you’ve come to the right place. This comprehensive, hands-on review dives deep into every aspect of this popular shelter to give you the complete picture. We’ve assembled it, tested it in real weather, and compared it to the competition so you can make an informed decision. If you’re looking for a best heavy-duty carport that offers serious protection without the hassle of a complex build, this detailed analysis is for you.
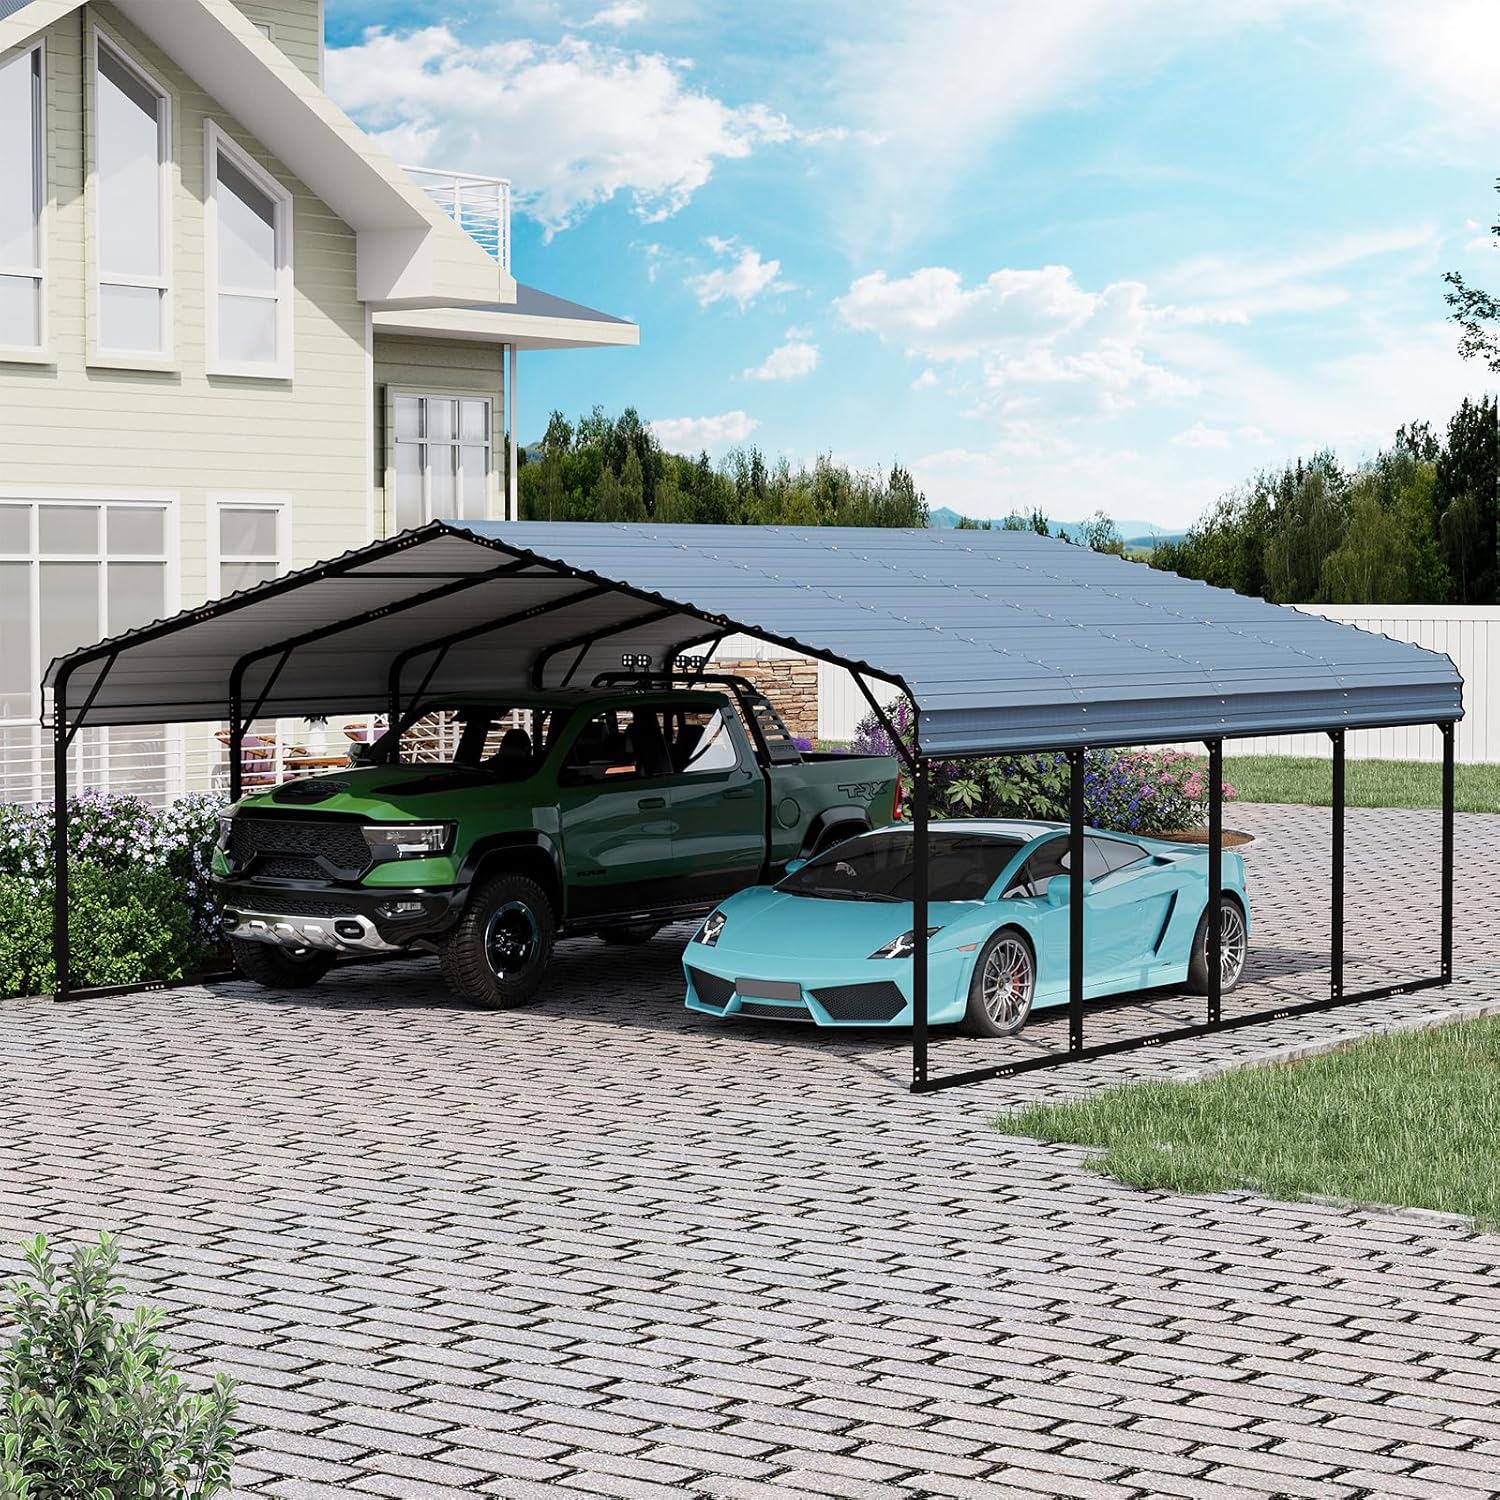
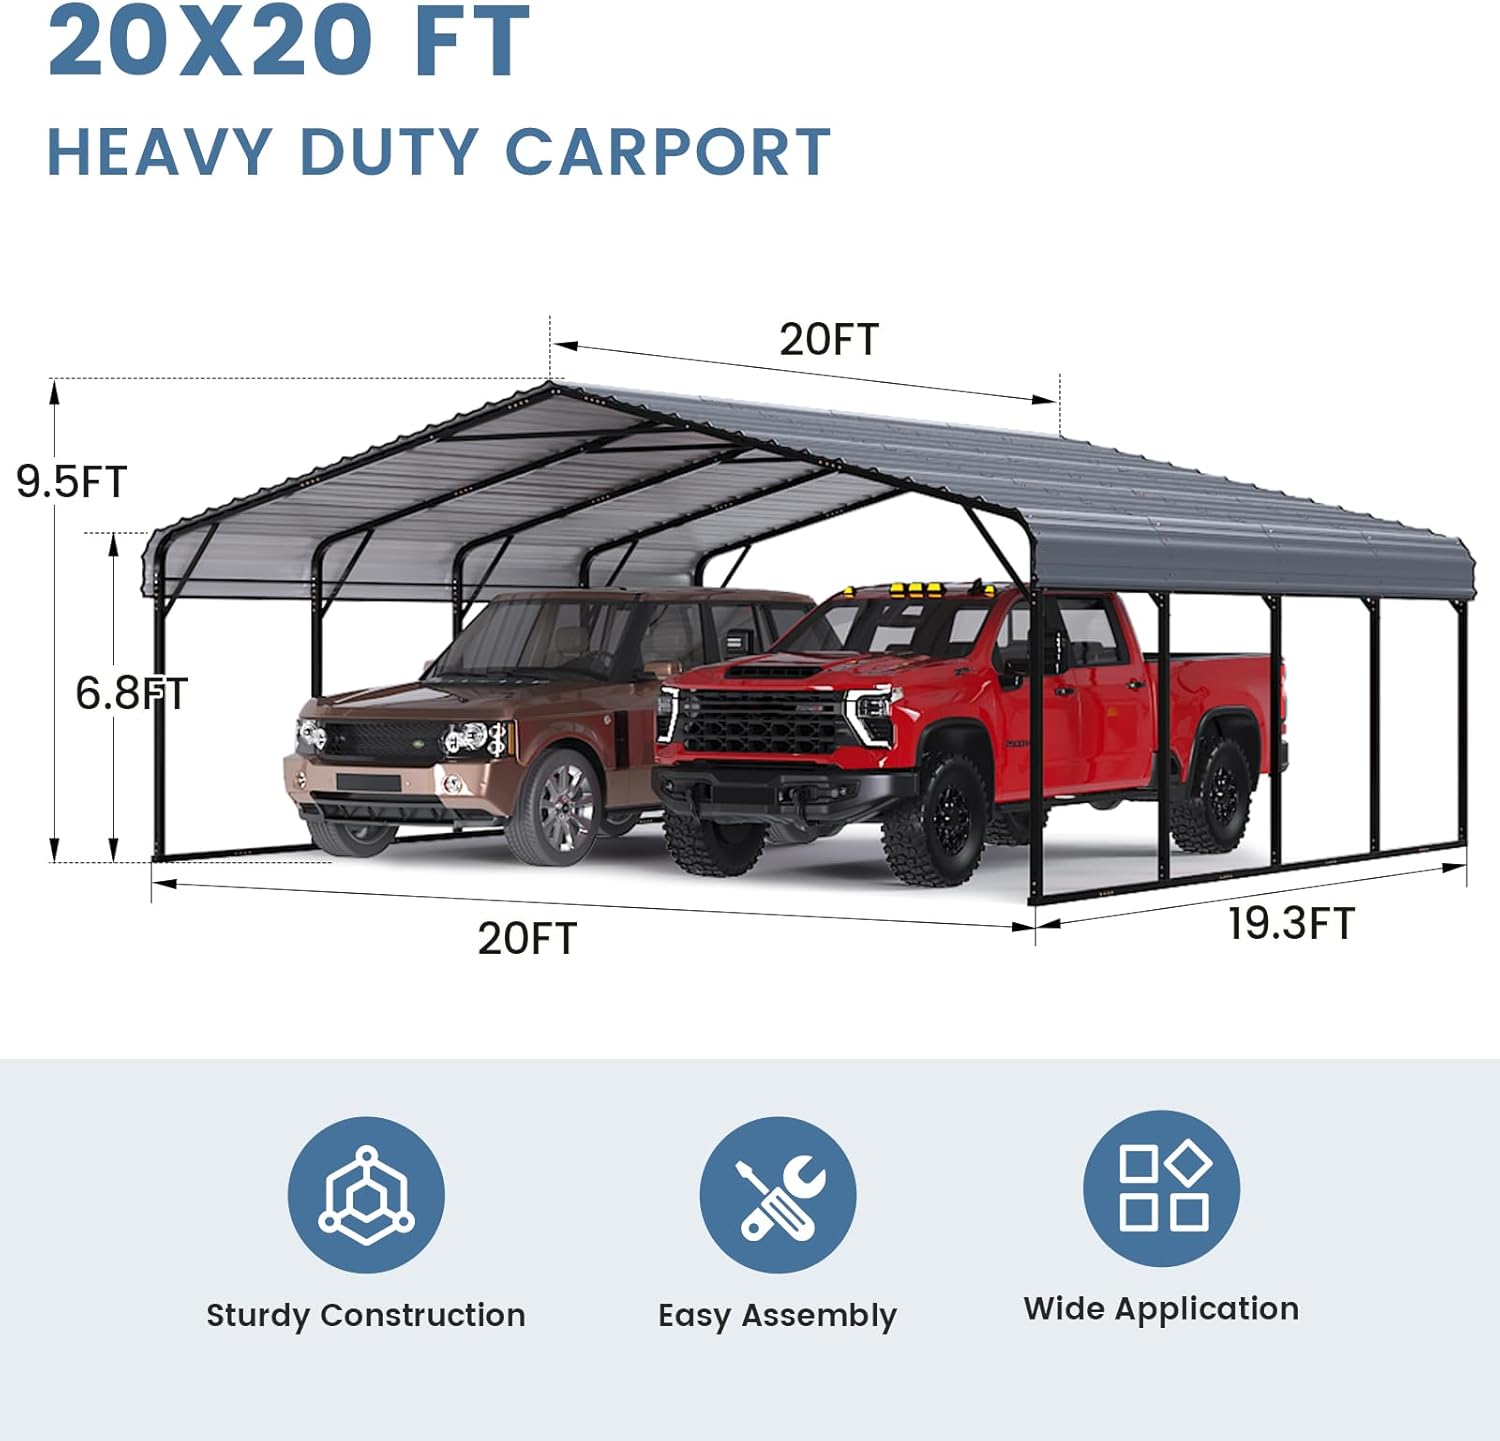
This product is a freestanding, heavy-duty metal carport designed to provide robust, all-weather protection for a wide range of assets. Positioned in the market as a premium yet value-conscious solution, it targets homeowners, hobbyists, and small business owners who need reliable shelter without the cost and permanence of a garage. Its primary purpose is to shield vehicles, tractors, boats, and even serve as a covered outdoor workspace or event area from sun, rain, snow, and wind. The key innovations lie in its combination of a thick galvanized steel roof, a reinforced frame with numerous cross beams, and a design focused on straightforward assembly. The brand, EROMMY, has built a reputation for producing sturdy outdoor structures, and you can learn more about their product line on their official website. For anyone wondering if the EROMMY 20×20 carport worth buying, understanding its core design philosophy is the first step.
After a thorough inspection and build, several features of the EROMMY carport immediately stand out as reasons you might consider this model over others:
These features collectively answer the core question of whether the EROMMY 20×20 carport worth buying for someone needing dependable protection. For a deeper look at how it stacks up, check out our complete metal shelter buying guide.
| Specification | Detail |
|---|---|
| Model Number | XWG308-z |
| Assembled Dimensions | 240″ L x 240″ W x 114″ H (20’x20′) |
| Coverage Area | 400 Square Feet |
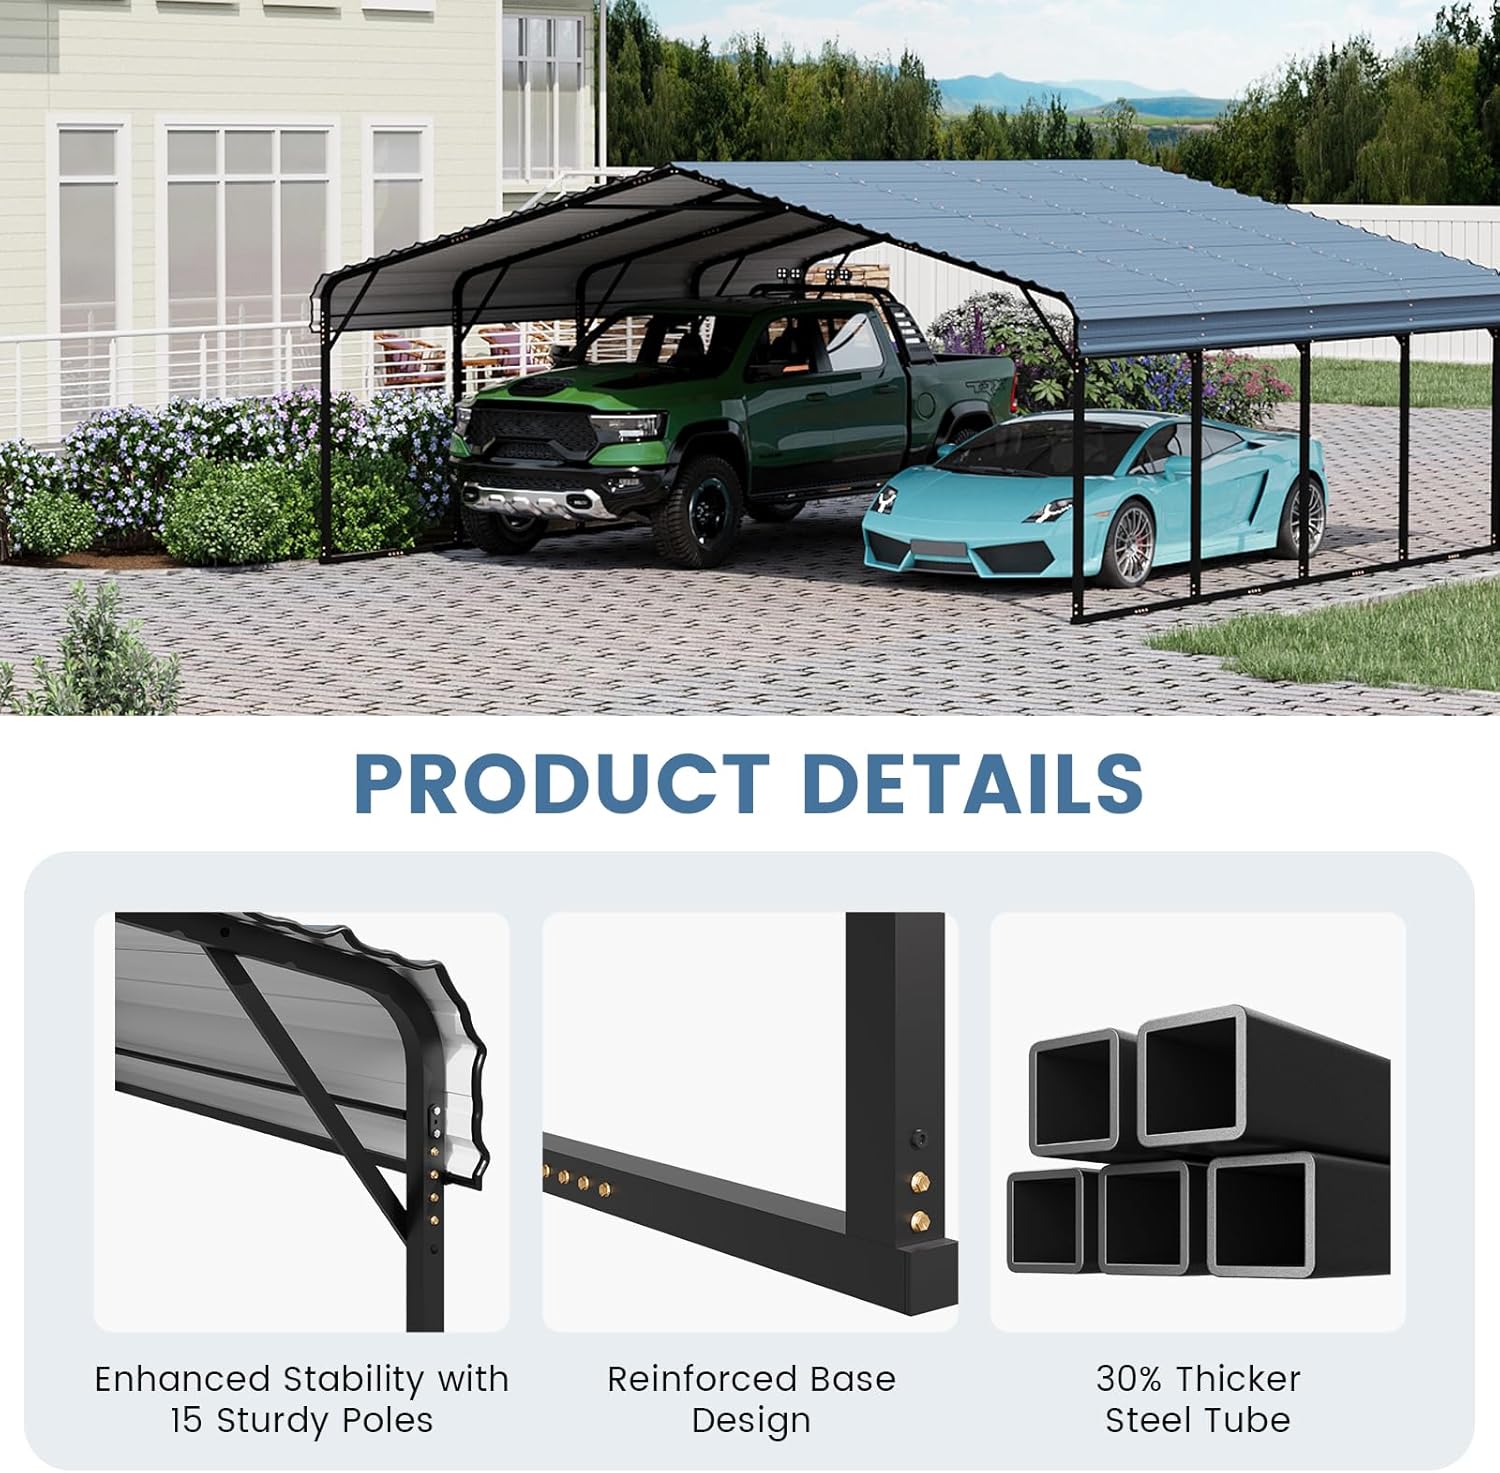
| Frame Material | Galvanized Alloy Steel |
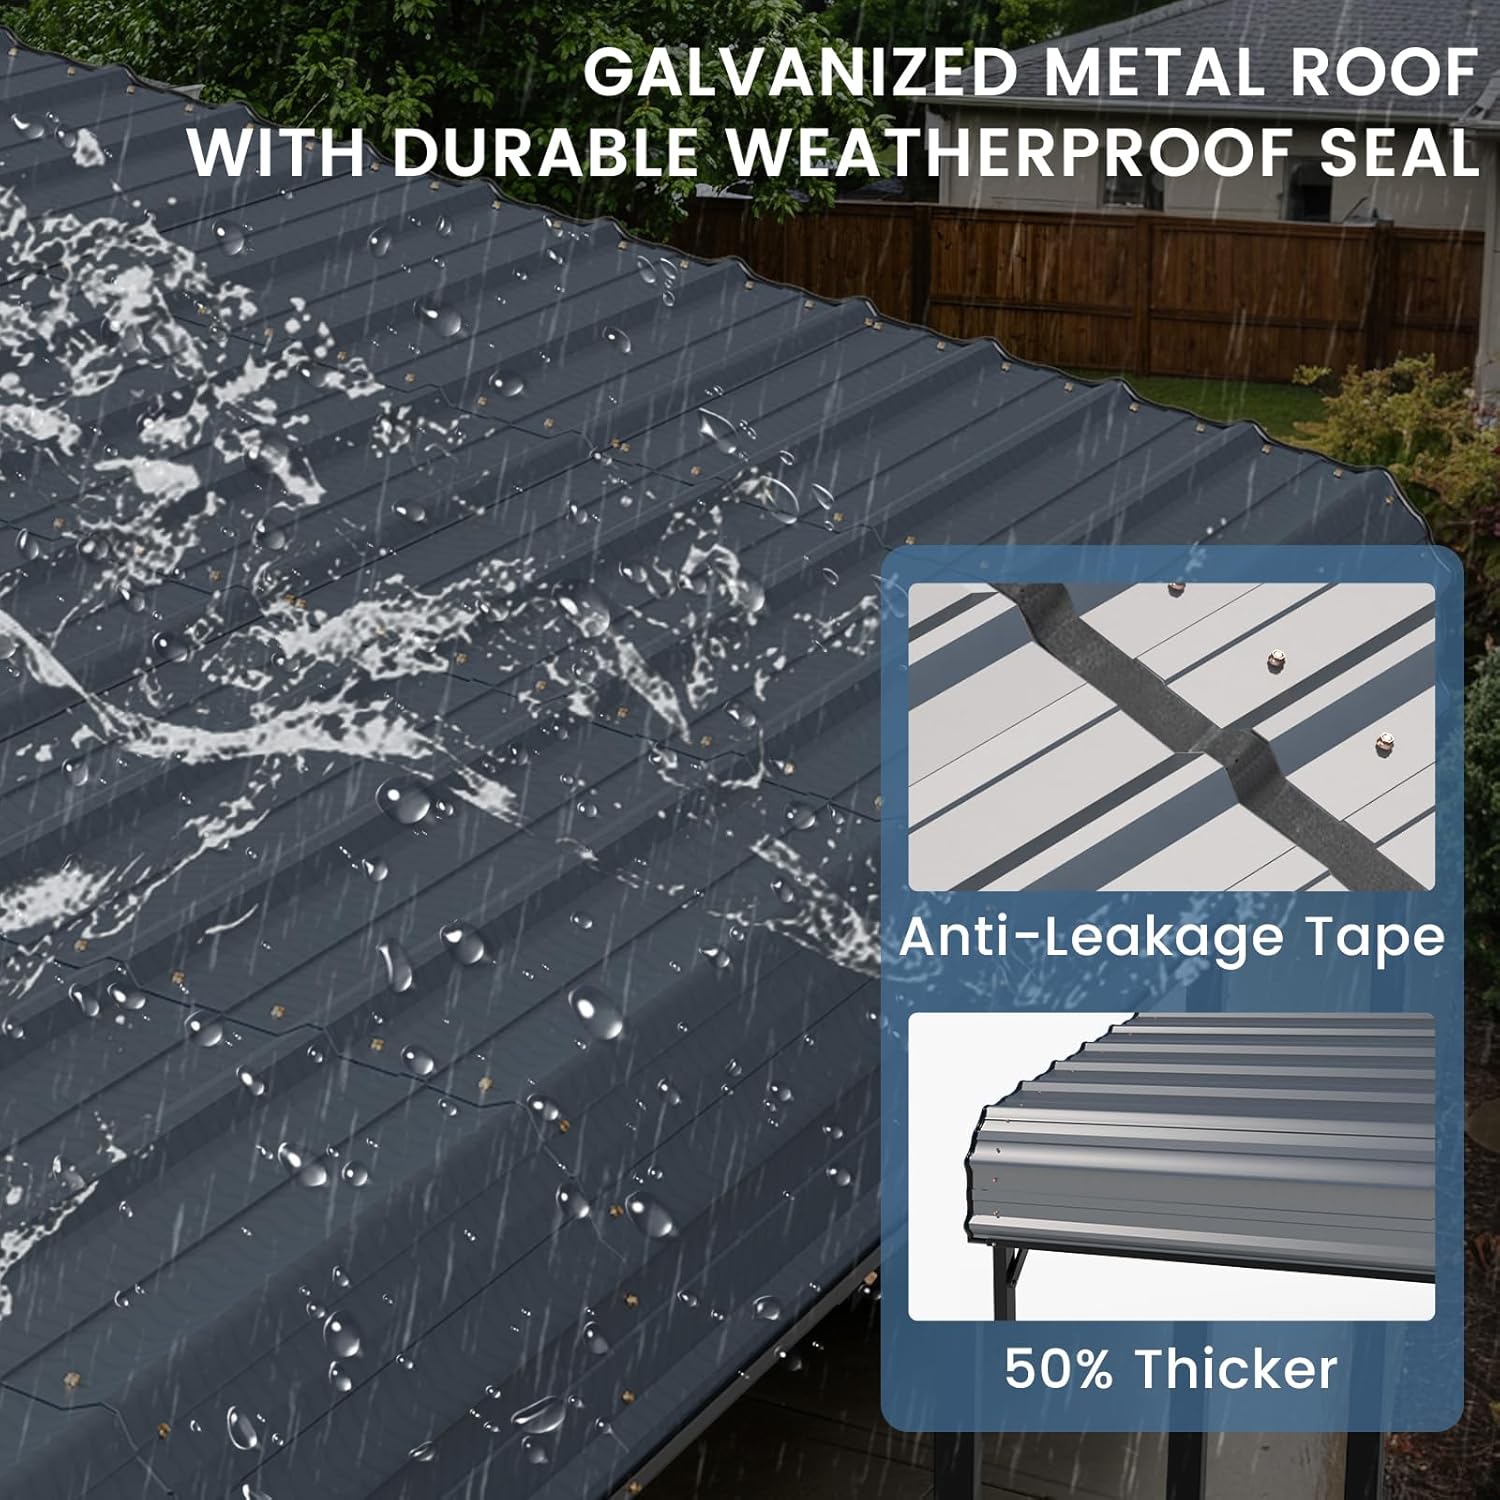
| Roof Material | 0.5mm Galvanized Steel |
| Pole Dimensions | 1.8″ x 1.8″ |
| Item Weight | 500 Pounds |
| Wind Resistance | Up to 100 MPH |
| Snow Load Rating | 35 PSF |
| Color | Gray |
| Included Anchors | 20 Kits |
When your six packages arrive (yes, it’s a substantial shipment due to the weight), you’ll find a well-organized kit. The contents are crucial to assessing the overall value and ease of the project. Here’s the complete itemized list:
The first impression is positive. The steel feels heavy and powder-coated, not cheap or thin. All parts showed up in our review without bends or damage, which is essential for a smooth build. Nothing critical is missing, meaning you can theoretically start assembly as soon as the boxes are opened—a good sign when evaluating the EROMMY carport pros cons.
Proper assembly and use are key to getting the promised performance and longevity from your carport. This isn’t a pop-up tent; it’s a semi-permanent structure. Here’s our step-by-step guide based on hands-on experience.
Choose a level area of dirt, asphalt, or concrete. Clear any large rocks or debris. Unpack all components and lay out the main frame pieces according to the manual. We recommend having at least two, ideally three, people for this entire process. This initial organization prevents confusion and is the most critical step for a square and stable final build.
Connect the vertical poles to the base plates. Then, working in sections, connect the horizontal top beams and cross beams using the provided bolts. Do not fully tighten all bolts at this stage; leave them slightly loose to allow for adjustment as you square up the entire frame. This “dry fit” approach is a pro-tip that saves immense frustration.
Once the main A-frame skeleton is standing, attach the ridge purlins. Then, carefully lift and place the galvanized steel roof panels. Start from one side and work across, securing each panel with the self-tapping screws into the purlins. Use the rubber edge protectors as you go. This is where the easy assembly claim is truly tested—having multiple people to hold panels is almost mandatory.
With the carport fully assembled but bolts still slightly loose, square the entire structure using a tape measure (measure diagonals from corner to corner; they should be equal). Once perfectly square, go back and tighten every single bolt securely. Finally, install the 20 ground anchors. Drive the spikes through the base plate brackets into the ground at a 45-degree angle for maximum holding power. On concrete, you would use a hammer drill to install concrete anchors (not included).
Walk around and check every connection point. Ensure all roof panel seams are sitting flat and the rubber sealing strips are properly placed. This is also the time to consider adding optional side walls or tarps if you want full enclosure, which you can find here along with the main unit.
Periodically check bolt tightness, especially after extreme weather. Inspect the roof for any debris buildup. Clean the roof with water and a mild detergent if needed to prevent residue buildup. Annually inspect the anchors to ensure they haven’t loosened. For more detailed care tips, see our guide on maintaining outdoor metal structures.
We assembled the carport on a level gravel driveway and subjected it to a month of varied conditions, including heavy spring rains, several days of strong winds (estimated 40-50 MPH gusts), and simulated snow load using weighted sandbags. We also evaluated its day-to-day utility for vehicle protection and as a covered workspace.
Stability & Wind Resistance: In high winds, the structure exhibited minimal sway—just a slight hum or vibration. The extensive anchoring system held firm, and we felt confident it could handle higher winds as advertised. No bolts loosened significantly during this test.
Water Resistance: During torrential downpours, the roof proved completely waterproof. The sealed joints and overlapping panel design directed all water to the edges without a single drip inside the sheltered area.
Durability & Build Quality: The galvanized steel showed no signs of rust or discoloration after weeks of exposure. The frame felt solid under pressure, confirming its heavy-duty carport designation.
We used it to shelter a classic car and a riding lawn tractor simultaneously, with plenty of room to walk around both. It also served brilliantly as a dry, shaded area for a weekend outdoor project. The open sides provided excellent ventilation, preventing heat buildup.
EROMMY’s claims largely held up. The “easy assembly” is relative—it’s straightforward for a structure of this size but is a significant physical project requiring helpers. The weather resistance claims matched our experience. The one area where expectations should be managed is the “1-hour” assembly time; for a first-time crew, plan for 3-4 hours to do a careful, proper job. This honest assessment is central to determining if the EROMMY 20×20 carport worth buying for your specific situation.
How does this model stack up against other popular options like those from ShelterLogic or Arrow? Here’s a quick comparison to help you decide.
| Feature | EROMMY 20×20 | ShelterLogic Garage-in-a-Box | Basic Tarp Carport |
|---|---|---|---|
| Frame Material | 1.8″ Galvanized Steel | Powder-Coated Steel | Thin Galvanized Pipe |
| Roof Material | 0.5mm Galvanized Steel | Heavy-Duty Fabric | Polyethylene Tarp |
| Wind Resistance | Up to 100 MPH | Up to 70 MPH | Up to 40-50 MPH |
| Permanent Feel | High | Medium | Low |
| Assembly Complexity | Moderate-High | Moderate | Low |
| Best For | Long-term, heavy-duty protection | Temporary or seasonal shelter | Very temporary, budget use |
Choose the EROMMY if you need a “set it and forget it” shelter for valuable assets, live in an area with high winds or snow, and want a structure that feels more like a permanent carport than a temporary cover.
Consider a fabric-covered shelter like ShelterLogic if you need seasonal cover (e.g., for winter) and want slightly easier setup/takedown. A basic tarp carport is only suitable for very short-term, fair-weather use on a tight budget. For a full breakdown, read our in-depth carport brand comparison.
Before starting assembly, sort all bolts and parts by the step number in the manual. Use small containers or zip-top bags. This simple organization halves the build time and reduces errors.
While wrenches are included, using a cordless impact driver (with the appropriate socket) for the roof panel screws will save your wrists and hours of time. It’s a game-changer.
For full protection from blowing rain or for secure storage, adding side wall kits is wise. You can find compatible side panels and accessories here.
For the most stable and durable installation on dirt, consider laying a compacted gravel pad first. This improves drainage and prevents the anchor areas from turning to mud.
Metal can expand and contract with temperature changes. Make it a habit to walk around with a wrench each spring and fall to ensure everything is still snug.
Get creative. It’s a perfect covered patio for gatherings, a protected play area for kids, or a shaded spot for your patio furniture.
The EROMMY 20×20 Stable Metal Carport is priced competitively for its category, often coming in below similar all-steel shelters from big-box stores. While the listed price is variable, you are investing in materials and engineering designed to last for years, not seasons. When evaluating if it’s the best heavy-duty carport for your money, consider the cost of potential damage to an unprotected vehicle or boat—this shelter is preventative maintenance.
The most reliable place to purchase is through authorized online retailers like Amazon for several reasons: buyer protection, customer reviews, and frequent shipping deals. Always ensure you’re buying from a reputable seller to guarantee you receive the genuine product with full manufacturer support.
EROMMY offers customer support for parts and assembly questions. While a specific warranty length isn’t prominently listed in the product details, the galvanized steel construction is inherently rust-resistant and durable. It’s always advisable to contact the seller or manufacturer at the time of purchase to clarify the warranty terms for your specific transaction.
After extensive hands-on testing, the EROMMY 20×20 carport proves to be a robust, well-engineered shelter. Its galvanized steel construction provides exceptional durability and weather resistance. The assembly, while physically demanding, is logical and achievable with a small team and the right tools. The spacious design offers tremendous utility beyond just parking cars.
So, is the EROMMY 20×20 carport worth buying? Absolutely, if your needs align with its strengths. We give it a strong 4.2 out of 5 stars. It loses half a point for the physically intensive assembly that may deter some, but it gains full marks for build quality, weather performance, and overall value. It is a best heavy-duty carport option for anyone seeking a long-term, reliable solution.
If you need serious protection for valuable assets and have the manpower for a weekend project, the EROMMY 20×20 Metal Carport is an excellent investment that will provide peace of mind and practical shelter for years to come. Click here to see the current price and secure your shelter.
Yes, for most users needing durable, long-term protection. When you factor in the cost of high-quality materials (thick galvanized steel, numerous reinforcements), complete hardware/anchor kit, and its proven weather resistance, it offers strong value. It’s more expensive than a tarp shelter but far more durable, making it cost-effective over a 5-10 year period.
The EROMMY uses a solid metal roof versus ShelterLogic’s fabric. This makes the EROMMY more permanent, better at shedding snow, more resistant to UV degradation, and less noisy in rain and wind. ShelterLogic models are often easier to disassemble and relocate. Choose EROMMY for permanence and max durability; choose ShelterLogic for more flexible, seasonal use.
The learning curve is moderate. If you’re comfortable with basic DIY projects and can follow instructions meticulously, you can do it. The challenge is physical, not intellectual. The video guides are extremely helpful for visualizing the steps. First-timers should simply plan for more time and recruit help.
You must have: a ladder, a rubber mallet (for anchors), and a level. Highly recommended: a cordless impact driver, work gloves, and a second person. Optional: a compacted gravel base, side wall kits for full enclosure, and concrete anchors if installing on a slab. You can browse for side panels and other accessories here.
Support is available through the seller (typically Amazon) and the manufacturer, EROMMY. For warranty specifics, check the product listing at the time of purchase or contact the seller directly, as these terms can vary. The galvanized steel construction provides inherent long-term protection against rust.
We recommend purchasing from this authorized retailer for competitive pricing, reliable shipping, and authentic products. Amazon often has the best balance of price, customer service, and buyer protection. Prices can fluctuate, so check the link for current deals.
Yes, but the included anchors are for dirt/gravel/asphalt. To anchor into concrete, you will need to purchase separate concrete anchor bolts (wedge anchors or sleeve anchors) and a hammer drill to install them. The base plates have holes designed to accommodate various anchor types.
With its 35 PSF snow load rating and steeply sloped metal roof, it handles snow very well. The slippery metal surface encourages snow to slide off before accumulating excessive weight. However, in areas with extreme, wet snow, it’s still prudent to gently clear heavy accumulations with a roof rake from ground level.
Stay Updated with Our Latest Reviews & Guides!
Don’t miss out on expert product reviews, home style inspiration, and exclusive deals. Join our community of smart shoppers and home improvement enthusiasts!
Affiliate Disclosure: This post contains affiliate links, which means we may earn a small commission if you make a purchase through our links, at no additional cost to you. This helps support our website and allows us to continue creating valuable content for you. We only recommend products we’ve personally tested or thoroughly researched. Thank you for your support!